User Information
Currency Settings
Add or Delete Category
Default Settings
Setup Wizard
Delete Old Data
- Setup
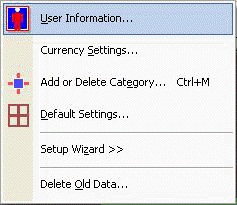
menu mainly contains submenus for initial Setup of MoneyCare + program.
Submenus are shown in Figure C.
Figure
C. Sub Menu Of Setup Menu
13)
User Information:
This opens window for entering User Information as shown in Figure 9. You can
add Your Name/Business Name, Address,
Phone Number, Fax Number, E-Mail Address, Logo (if any) etc. Multiple Phone
Numbers and Fax Numbers can be added by separating with a coma. Additionally,
information such as Unit/Branch/House (Eg: Production Unit, Sales Division,
Home, Office etc.) also can be entered for initial Setup. There should be at
least one entry for Unit/Branch/House (before entering Income/Expense
particulars), since program may require to detect transactions in various
Unit or Branch or House. If you do not require to specify
particular Unit or Branch or House, you may again enter what that is entered for
user name. However, there should be at least one entry in the space provided for
Unit/Branch/House, since program is detecting transactions corresponding to it.
Home, Office and Personal is entered for Unit/Branch/House by default.
You may Delete these default entries and may Add other Unit/Branch/House, if
required. It depends on you to put the information relevant to the context. If
you add any Logo, it will be displayed in reports.

Figure
9. User Info
If you want to add
another Unit/Branch/House later, you may add it later. If you want to delete any
Unit/Branch/House, select it from the combo box and click Delete button. If it
is Income or Expense entered Unit/Branch/House, then Backup
recommending message box will appear to confirm that you really wanted to
delete it. Take care while deleting Income or Expense entered Unit/Branch/House
as it may lead to lose data relevant to the deleting criteria.
14) Currency
Settings: Here
you can setup the Currency symbol (Figure 10). You may enter $ or any other
Currency symbol that is considered to be the symbol of your currency.

Figure 10. Currency Settings
Window
15) Add/Delete
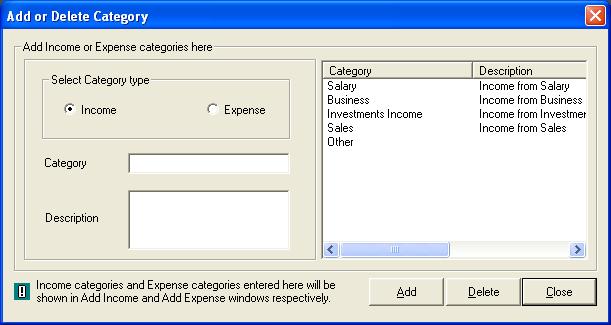
Category: This is to add required
Income/Expense categories that may be used in transactions. Description for each
Category can be given, if required. You may Add more and more categories later
also. Make sure you have selected appropriate button for Income or Expense,
while entering each Category in the space provided. Provision is there for
deleting a specified Category also. Add/Delete Category window is shown in
Figure 11.
Figure
11. Item master window
After typing
Category in the space provided, if you click Add button, it will be added to the
list. If you select any Category from the list and click Delete button, a window
will appear to select the Unit/Branch/House from which it has to be deleted
(this happens only if transaction is entered in this category). If
you select all Unit/Branch/House, it will be deleted from the Category list.
If you have not selected all the Unit/Branch/House, Category will remain in the
Category list... but entries in that Category relevant to selected
Unit/Branch/House will be deleted and will reflect in the reports. Add/Delete
Category window can be accessed by clicking on blue square Icon on MoneyCare +
interface or by pressing the keys Ctrl and M simultaneously.
If required, you may assign another shortcut key also using Menu Shortcut
Keys in Default Settings window.
16) Default
Settings: This is for the Default
Settings in MoneyCare +. Provision is there for enabling Automatic Backup (for
automatically backing up database while closing MoneyCare +), setting Backup
Database path (folder to where backup file should be stored) and enabling
Automatic Compacting (for automatically compacting database while closing
MoneyCare +). You can also opt Bypass Password (if you do not require password,
this will avoid password prompt while starting MoneyCare + each time), Launching
Application on Windows Startup (to start MoneyCare + program when you start
Windows ) etc. Compact Database is to compact the Database as its name
implies. If you have done certain task like deleting old data, data file may not
reduce the size. Compact Database can rectify it.
General Settings page in Default
Settings window is shown in Figure 12.

Figure 12. Default Settings Window
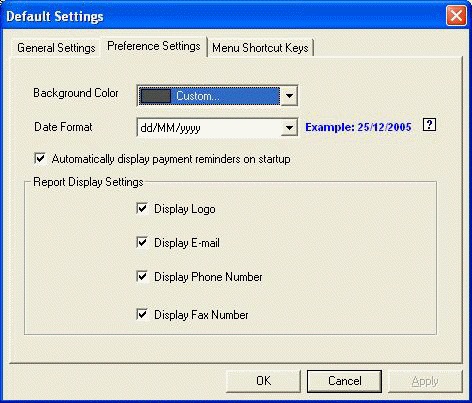
Figure 13. Preference Settings Window
Preference
Settings in Default Settings window contains provisions for
displaying/printing Logo at header and
E-Mail, Phone Number and Fax Number at footer of the Report page. You can
set preferred background color also.
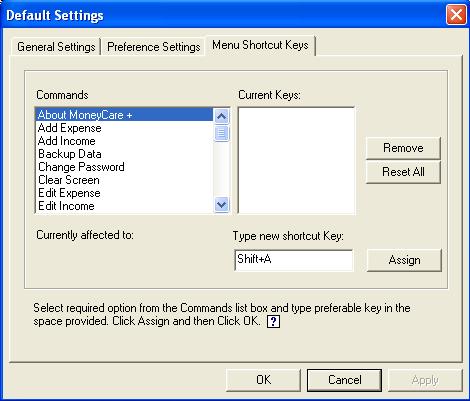
Figure 14. Menu Shortcut Keys
Menu
Shortcut Keys in Default
Settings window contains provision for setting the keyboard shortcuts. With
this option, you can use your own custom keys to invoke certain windows. Select
the required option from left list box and then type desirable key/letter in the
space provided. If this key is already taken for another window, there will be
indication in red letters. If it is not taken, click Assign and then click OK.
Do not forget to click Assign button before clicking OK. If custom keys are
assigned, instead of going to relevant menu and submenu you may press those
keys.
17) Setup
Wizard: This will start all the already
explained Setup options one by one for initial Setup of MoneyCare +. This
is an easier method to start initial Setup of this program, after installation.
18) Delete
Old Data: This
may be done to increase the speed of MoneyCare + program and to save space and
size of the database. You can delete Expense, Income or both until a specific
date. This removes old data consisting transactions until the selected date.
Income/Expense details after the selected date remain in the program. Delete Old
Data window is similar to Figure 15.
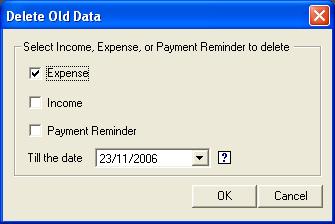
Figure 15. Delete Old Data Window
Make
sure you have selected appropriate checkbox for Income or Expense before
deleting old data. Then press OK button. If you press OK in the message box, a
confirmation message box will appear as shown in Figure 16. Old data can be
deleted according to your response. Deletion of old data speeds up MoneyCare +
program. This is especially in the case where size of database file is larger
than 3 MB.

Figure 16. Message Box Confirming Deletion